Importing data from a file requires that the variable names in the file match those in the model. You can create a template file for this, with all the constants in the model includes, by using the create import template dialog. This dialog is opened from the Import Data dialog box.
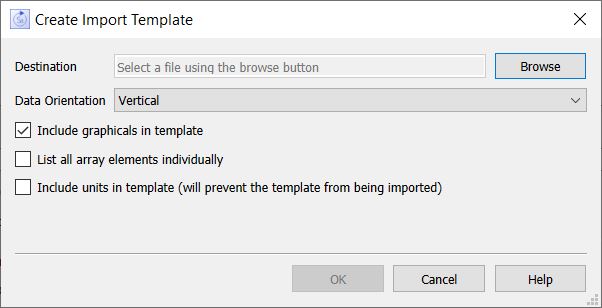
Choose a file by clicking on Browse (and if you select an Excel file, choose a worksheet), then choose an orientation. When you click OK, the file will be filled with all model constants and graphical functions whose values can be imported. You can then select the parts of this you want to use to create import files, in order to change those values.
Organize variables by determines the orientation of the template. Select column to have all the variable names appear in the first row, with values in the rows after. Select row to have one variable name and its values appear in each row.
Include graphicals in template, if checked, will include both graphicals and constants. Uncheck this to include only constants.
Use :x :y format for graphicals, if checked, will put out two entries for each graphical, the first with x values and the second with y values. If not checked just the y values will be included.
List all array elements individually, if checked, will only put a single value for each row or column instead of a slice. This can be helpful when values are coming from a database or other place where elements are enumerated individually. The sheet will be larger, but will have exactly the same results when imported.
Include units in template, if checked, will add the units of measure for the variable at the end of variable name (enclosed in {}. This is very useful for dumping all constants as part of a documentation process, though it will preclude actually using the resulting file for importing data.
See Importing and Exporting Data for more discussion of importing data.